Sunday, May 29, 2016

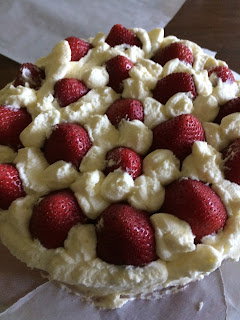
The Case of the Dueling Kitchenaid's and the Strawberry Dream Cake

OK on my now weekly adventure in baking I had the most popular result (so far) as voted by hungry medical people. So a little back story on the mixers. I have had my plain white Kitchenaid mixer for 30 years. I won't go into the details of who got it for me suffice it to say I should have known when I was gifted a white one that things weren't right. Nonetheless it has been a workhorse in my kitchen. I had always hoped to give it to one of my kids so I might purchase a shiny new color for myself. Well darn if those kids don't have their own mixers. My daughters is sunshine yellow and I think my son's might be stainless. About a year ago, due to unforeseen circumstances, my whisk attachment broke, while in use by a friend. So I have been using the mixer successfully with the other attachments, alas no whisk. Lo and behold a thing of beauty, this Christmas Santa's elves (and since I'm Santa that must mean my kids are the elves) gifted me a shiny red Kitchenaid Artisan Mixer!!!! Laaaaaaaaaaaaaaa!!! I am in heaven but I couldn't bear to part with the little engine that could so I have both mixers now. Well this week was a first an opportunity to use them at the same time. I felt so happy to have them side by side and reflective in a good way that my life has gone from white to shiny red !
Please enjoy this great recipe for Strawberry Dream Cake from Southern Living Magazine, perhaps one of the best cakes I've ever tasted.
Ingredients
whisking together dry ingredients

 Dueling Kitchenaids

 First Layer
Filling in the gaps
 My good luck spatula
 Ready for the fridge


Review - Amazing cake, could use more icing, cream broke slightly but did not affect taste and icing set and smoothed out while refrigerated. Tasters gave rave reviews . This one is a keeper !

Degree of Difficulty 6 of 10 spatulas. 

Baker's tip - when frosting place small pieces of parchment on cake plate before placing first layer down to frost after all frosting is complete remove parchment and the edges are clean and pretty !

Recipe
Strawberry Dream Cake
Southern Living Magazine
Cake

8 ounces softened salted butter
2 cups granulated sugar
4 large eggs, separated
3 cups flour
1 tablespoon baking powder
1/4 teaspoon salt
1 cup whole milk 1 teaspoon vanilla extract
1/2 teaspoon almond extract
about 24 large fresh strawberries

Frosting
8 ounces softened mascarpone cheese
2/3 cup granulated sugar (divided)
2 cups heavy whipping cream
1/2 teaspoon vanilla extract
1/2 teaspoon almond extract

1. Preheat oven to 350 degrees Farenheit, grease and flour 2 9" cake pans. Beat the butter at medium speed until fluffy, gradually add sugar, beating well. Add the egg yolks one at a time beating until just blended after each addition.
2. Whisk together the flour, baking soda and salt; add to butter mixture alternately with milk beginning and ending with flour mixture. Beat at low speed until just blended, add the vanilla and almond extracts.
3. In another bowl beat the egg whites at high speed until stiff peaks form. Fold about one third of the egg whites into the batter; fold in remaining egg whites in two batches. Spoon batter into prepared pans.
4. Bake in preheated oven until a wooden pick inserted into center of the cake comes out clean(28-32 minutes) Cool in pans for 10 minutes then turn out onto wire rack and completely cool for about an hour.
5. Meanwhile, cut a thin slice from the stem end of each washed strawberry to form a flat base, set aside.
6. Make frosting: Gently stir 1/3 cup sugar and mascarpone cheese in a medium bowl. Beat whipping cream and vanilla and almond extracts in a mixer until foamy increase speed and slowly add remaining 1/3 cup sugar, beat until stiff peaks form. Fold one third of the whipped cream into the mascarpone mixture and then the remaining mascarpone fold into the cream in two batches.
7. Place cooled cake layer on serving platter, spread with frosting and top with strawberries. Place about 1 1/2 cups frosting in a baggie, snip end and pipe frosting in between strawberries. Gently spread more frosting on top of strawberries.
8. Place second layer of cake on berry layer spread with remaining frosting. Garnish as desired. Refrigerate and serve.


Wednesday, May 18, 2016

Recipe #2 Mario Batali's Grapefruit and Honey cake

Grapefruit and Honey Cake

This particular recipe is one I tried from Mario Batali, you have to like a more savory cake. It would be great with tea or as a dessert after a particularly heavy meal. The cake itself is dense and beautiful. The grapefruit rind lends a bitter taste to the final product but served with some freshly whipped cream and a drizzle of honey... it's just divine. It also keeps well and probably freezes nicely too. Easy to make and on second thought maybe a nice hostess gift as it would be great for a brunch or breakfast cake. (Tip - do yourself a favor and grind your own breadcrumbs it really makes a nice difference) .

 1/4 cup and 3 tablespoons freshly ground breadcrumbs
2 medium grapefruits
1/4 cup extra virgin olive oil
4 large eggs at room temperature
1 teaspoon salt
1/2 cup sugar
1/4 cup honey
1 1/2 cups all purpose flour
2 teaspoons baking powder

Preheat oven to 350 degrees. Oil a 9" round cake pan with tall sides and dust it with the 3 tablespoons breadcrumbs. Zest both grapefruits ( for a less bitter taste you can cut back on the zest and when grating make sure to only get the skin not the white pith, it's way more bitter). Juice 3/4 cup juice from one of the fruits. Combine zest, juice and olive oil in a bowl.
In a large bowl beat the eggs and salt with an electric mixer until frothy and light, slowly beat in the sugar and then the honey, continue mixing until pale and thick (about 2 more minutes).
Sift into the egg mixture the baking powder, additional breadcrumbs and flour, when combined fold in the grapefruit juice mixture until just incorporated.
Pour batter into pan and bake for 50 minutes until a toothpick inserted in the middle comes out clean. Cool in pan on wire rack for 10 minutes then remove from pan and let cool completely on rack. Serve with fresh whipped cream and a drizzle of honey or if you are really ready to knock 'em dead section some grapefruits for the top as well.
Always great to get your ingredients out first so nothing is missing !

Pan oiled and dusted with breadcrumbs

finished cake out of the oven on cooling rack

first slice ( couldn't wait 'til after dinner)

Presentation with fun feather wreath
Degree of difficulty 4/10
Recipe from Mario Batali Simple Italian Meals - from my home to yours. Available in Bookstores.


Saturday, May 14, 2016

Baking 101 Number 1 - peanut butter and jelly bars

OK Folks - frustrated with the lack of creativity currently in my life, and unable to work on Broadway singing and dancing I have committed to learning to bake. Working full time I decided, once a week, to try a new recipe and my successes and failures will show up here for all to see. I will try to reference the recipe each week if I can and give a degree of difficulty !


#1
Barefoot Contessa's 
peanut butter & jelly bars
from
barefoot contessa at home
degree of difficulty 2/10

 Source book
Page 170-171 
 Ingredients at the ready
 2/3 of the dough spread in prepared 9x13 pan
 Fruit jam
 1/3 dough crumbled on top
PEANUTS !

 Just out of the oven
Finished product !


1/2 lb unsalted butter
1 1/2 cups sugar
1 teaspoon pure vanilla extract
2 room temperature extra-large eggs
2 cups creamy peanut butter
3 cups all purpose flour
1 teaspoon baking powder
1 1/2 teaspoons kosher salt
1 1/2 cups jam of your choice
2/3 cup salted chopped peanuts
1. Preheat oven to 350 degrees F.
2. Grease and flour a 9x13x2 pan.
3. In an electric mixer with paddle attachment cream butter and sugar 2 minutes.
4.At low mixer speed add vanilla, eggs and peanut butter until combined.
5. Sift together flour, salt and baking powder then add a little at a time until combined with wet mixture.
6. Spread 2/3 of dough into prepared pan.
7. top with jam.
8. crumble remaining 1/3 of dough on top.
9. sprinkle with chopped peanuts.
10. Bake for 45 minutes, cool, cut and enjoy !


Results: Strong peanut taste, cookie like a shortbread, don't skimp on the jam might even add more ! Pretty terrific warm with milk !


Sunday, August 3, 2014

First inspiration - Let's get cooking !

I love the indulgence of being able to share things I love with friends. My first blog http://isabel-muse.blogspot.com has been about cooking, decorating, gardening, travel etc. When I have  the luxury of time to write a post I really enjoy the design and time to review pictures and places I love and then share that with those of you who are interested. Today I was inspired by my friend Laurie's garden to come up with a list. My own home cook's bucket list, if you will, of recipes I want to try. I will post  recipes from my bucket list with the link to the book or source, I would love your comments, feedback and most especially, if you make the recipe, your pictures. Feel free to share things on your own cooking bucket list. I know many of my friends and family are amazing home cook's. Even my son, Chef Justin started as a home cook. So let's have fun together and get cooking ! Here's the first one on my list. I will need to use a grill pan, I can taste the results already ! Now to find the figs !


Grilled Corn and Figs with Balsamic Reduction

serves: 6 servings

You probably have enjoyed grilled corn; you may or may not have tasted a grilled fresh fig. I'm almost sure, however, that you never had them together in one dish. But when late summer brings them to market at the same time, I hope you will try this recipe. It's a simple one to do ahead: you grill the corn on the cob and then grill the figs (they take barely a minute). You slice off the corn kernels, toss them with the figs and serve the dish at room temperature. The golden vegetable and dark fruit are a great-tasting and pretty combination just as they are, but if you happen to have some balsamic drizzling sauce already made (or a bottle of balsamic vinegar to reduce) it's definitely worth applying the final swirl of sauce. The acidic tang sets off the sweetness of all the sugars in the corn and figs, already intensified by the heat of the grill. You can use either a gas or a charcoal grill for this, but keep the fire moderate (and pay attention, especially with the figs) so the sugars are caramelized, not burned.

ingredients
6 large ears sweet corn
2 tablespoons extra-virgin olive oil
¾ teaspoon of salt, plus more to taste
1 pound (about 1 pint) ripe fresh figs, preferably a dark variety

For Serving
1 to 2 tablespoons reduced balsamic vinegar

directions


Clean the grill rack very well. Heat it with medium heat, if you're using a gas grill. If a charcoal grill, ignite and spread a bed of coals in a low layer that will cook all the ears of corn over moderate-not searing-heat. (If you can, adjust the height of the rack, too, to avoid burning the corn.)

Shuck the corn and remove all the silks. Put the ears in a big bowl or on a tray, pour the olive oil and sprinkle 1/2 teaspoon of salt all over them. Roll them around and rub them with your hands so they're well coated.

To prepare the figs, trim their stems and slice them all in half (through the stem end to the pointy blossom end).

Lay the ears of corn on the grill, and cook them for 7 minutes or more, turning them frequently, until the ears are nicely grill-marked and the kernels are tender. Don't burn them and do shift them around the grill so they cook evenly. Let them cool while you grill the figs.

Wipe off the rack, if necessary, and have it hot so the figs don't stick. Set the fig halves on the rack, cut side down, and cook them only for a minute or so, to caramelize the cut side and soften the flesh. Don't let them burn or get mushy.

With a sharp knife, slice the grilled kernels off the cobs and gather them in a mixing bowl. Put in the fig pieces and toss together with the corn, adding another 1/4 teaspoon of salt or more to taste.

Serve warm or at room temperature in a wide bowl or platter. If you're drizzling with the balsamic reduction, it's best (and prettiest) to spread the corn and figs out in a shallow layer on a platter and swirl the vinegar with a teaspoon or fork in thin streaks over the top. This will give every spoonful of corn a delicate accent of sauce.

Lidia's Family Table

This book contains more than 200 fabulous dishes that will appeal both to Lidia's loyal following, who have come to rely on her wonderfully detailed recipes, and to the more adventurous cook ready to experiment

- See more at: http://www.lidiasitaly.com/recipes/detail/404#sthash.2F2kUtbV.dpuf